SmartPaint 1.5 User's Guide
Contents
1. Introduction
2. Requirements
3. User interface
4. Tools
5. Supported Image File Formats
1. Introduction
Welcome to the SmartPaint user's guide. SmartPaint is a freely available software tool for interactive segmentation of medical 3D images, e.g., MRI or CT images. SmartPaint can be downloaded from http://www.cb.uu.se/~filip/SmartPaint/.
2. Requirements
SmartPaint requires a 64-bit version of the Windows operating system.
3. User Interface
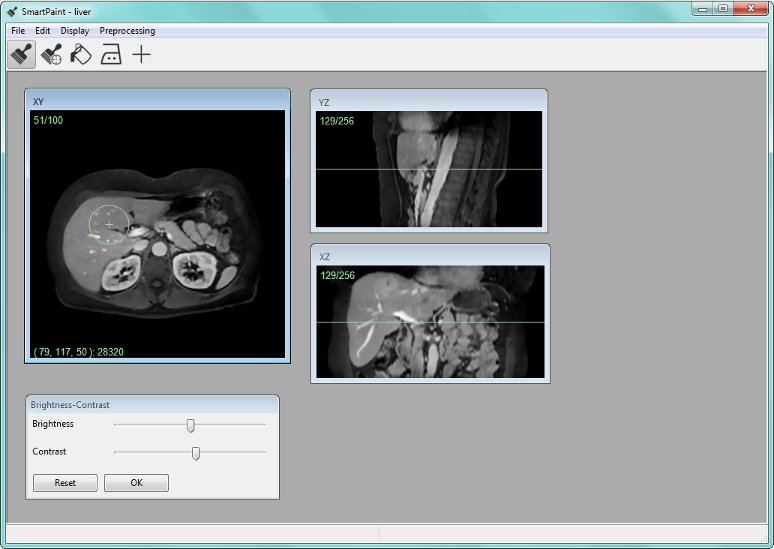
The above picture shows a screenshot of the SmartPaint user interface. SmartPaint shows the image data in three orthogonal views. The segmentation tools can be used in any of the views, and the results are updated globally. The three views can be moved and resized freely. The user can scroll between slices in any of the views using either the mouse wheel or the up/down arrow keys.
SmartPaint implements a number of tools for segmentation, and these can be selected from the toolbar at the top of the window.
The segmentation is displayed as semi-transparent yellow overlay. The display of the segmentation can be turned on/off by pressing the space bar. Toggling the segmentation display on and off is often useful for judging the correctness of the current segmentation.
Menus
File menu
- Load volume. Loads a volume image to be segmented. Supported file formats are listed here.
- Save segmentation. Save the current segmentation to a VTK file. To understand the contents of this file, we must first say a few words about how SmartPaint represents the current segmentation internally. Rather than representing the segmentation state of a voxel as a binary value (object or background), SmartPaint assigns to each voxel a real value between 0 and 1. Voxels whose value is greater than 0.5 are belong to the object, and all other voxels belong to the background. There are two reasons for why we choose to represent the segmentation in this way. Firstly, it allows information about previous user actions to be retained between interaction events - A voxel whose value is very close to 0.5 is more likely to change its label during subsequent interaction events than a voxel whose value is close to 0 or 1. This behavior has a subtle, but important, effect on the user experience. Secondly, this type of representation can be used to extract geometrical features, e.g., volume or surface area, from the segmented object with subvoxel precision. In the saved segmentation file, the segmentation state of each voxel is stored as an 8 bit unsigned integer value. Thus, each voxel is assigned a floating point value between 0 and 1. Voxels whose value is greater than 0.5 belong the object, and all other voxels belong to the background.
- Load segmentation. Load a previously created segmentation from a file. Supported file formats are listed here. The loaded segmentation must have the same size as the currently loaded volume. As described in the "Save Segmentation" section above, the segmentation should be a volume image with floating point values in the range 0 to 1. To support segmentations produced with earlier versions of SmartPaint, it is also possible to load volumes of unsigned integer type. During loading, all segmentation values in such files are divided by 255 to map them to the correct range.
- Preferences. Open a dialog for editing user interface preferences.
- Quit. Quit SmartPaint.
Edit menu
- Undo. Undo the last segmentation operation.
- Clear all. Reset the current segmentation.
- Toggle 3D paint mode. By default, all segmentation tools available in SmartPaint operate in 3D, i.e., painting in one slice also affects voxels in nearby slices. For additional control, is is also possible to switch to a 2D mode, where the effect of the tool is restricted to the active slice. This menu toggles between 2D and 3D mode.
Display menu
- Brightness-Contrast. Open a dialog for adjusting the brightness and contrast of the image display.
- Change display interpolation. Toggles the interpolation method used for image display between nearest neighbor interpolation and tri-linear interpolation.
- Toggle segmentation. Turns the display of the current segmentation on/off.
Statistics
- Show statistics. Opens a dialog showing the volume of the currently segmented object. This is calculated as the number of voxels in the object multiplied by the size of a single voxel. The volume is also copied to the clipboard, so it can easily be pasted into another application.
4. Tools
SmartPaint implements a number of tools for performing segmentation. In this section, we describe these tools.
4.1 Brush tool

This is the default tool of the software, intended for general purpose creation and editing of a segmentation. The tool allows the user to paint the segmentation by sweeping the mouse cursor in the image while holding a mouse button. The left mouse button is used to add to the object, while the right mouse button is used to remove parts of the object. The key feature of the brush tool is that the amount of "paint" applied to a voxel during painting depends on both the spatial distance and range distance (difference in image intensity values) between the voxel and the mouse cursor. The effect, from a user perspective, is that the brush seems to ``understand'' where the user wants to apply it, selectively sticking to objects of interest while avoiding other structures.
Parameters:
- Radius. The radius of the brush can be adjusted using ctrl-mouse wheel.
- Sensitivity. This parameter determines how much the brush adapts to the image content. When this value is zero, the image content is not taken into account at all when painting. With higher values, the brush adapts more to the image content. The sensitivity can be set using shift-mouse wheel.
4.2 Reference brush tool

The brush tool described above requires the user to drag the mouse cursor inside the object that is to be segmented. For very small objects this might require high precision movement, slowing down the segmentation process. For these situations, we have developed an alternative tool that we call the reference brush. This tool works just like the brush tool, with one exception: the range distance is not calculated with respect to the center of the brush, but relative to the intensity of a reference point, specified by the user by alt-clicking once in a representative area of the image. By specifying a reference point, the user indicates to the software that he/she wants to segment objects with intensity similar to the reference point. The reference point can be changed by the user at any time during segmentation.
Parameters:
- Radius. The radius of the brush can be adjusted using ctrl-mouse wheel.
- Sensitivity. This parameter determines how much the brush adapts to the image content. When this value is zero, the image content is not taken into account at all when painting. With higher values, the brush adapts more to the image content. The sensitivity can be set using shift-mouse wheel.
4.3 Bucket tool

This tool allows the user to fill large areas in the image with either foreground or background labels, and is very useful for quickly initializing a segmentation. A single click in the image affects the labels of all the voxels within a user specified radius. Again, the effect of the tool is adapted to the image content. The left mouse button is used to add to the object, while the right mouse button is used to remove parts of the object.
Parameters:
- Radius. The radius of the brush can be adjusted using ctrl-mouse wheel.
- Sensitivity. This parameter determines how much the tool adapts to the image content. When this value is zero, the image content is not taken into account at all when painting. With higher values, the brush adapts more to the image content. The sensitivity can be set using shift-mouse wheel.
4.4 Smoothing tool

When segmenting noisy images, using the tools described above tends to produce segmentation results with noisy and jagged boundaries. Therefore, we additionally provide a smoothing tool, that can be used to locally regularize the boundary of the segmentation. A single click with the smoothing tool affects all voxels within the tool radius adaptively, giving a smoother segmentation boundary in homogeneous image regions while preserving the segmentation in regions where the segmentation boundary coincides with high contrast edges in the image.
Parameters:
- Radius. The radius of the tool can be adjusted using ctrl-mouse wheel.
- Sensitivity. This parameter determines how much the smoothing procedure should preserve the segmentation in regions where the segmentation boundary coincides with high contrast edges in the image. When this value is zero, the smoothing is uniform and does not the take the image content into account. With higher values, the smoothing adapts more to the image content. The sensitivity can be set using shift-mouse wheel.
4.5 Navigation tool

When clicking with this tool in one of the three image view, the other view scroll to that point. This is useful for navigating within the volume image. The tool does not alter the segmentation in any way.
Parameters:
None.
5. Supported Image File Formats
Smart paint can load volume images in the following formats:
Segmentation results are saved in the VTK format. Internally, SmartPaint uses the Grid3 library for loading and saving volume images.